Saturday, October 3, 2020

Drawing the Figure from the Inside Out


Fourth Grade Figures from the Front and the Back

In this project, you will learn how Renaissance artists used the skeleton to help them draw realistic bodies.  When thinking about the bones inside our bodies,  we can draw the body in proportion.  The figures shown here are all examples of proportional figures drawn by Prescott students.  They drew the skeleton, cut it out, and then used it as a guide for drawing a figure.   Leonardo, Michelangelo and Raphael, all studied human anatomy to improve the realism of their work.
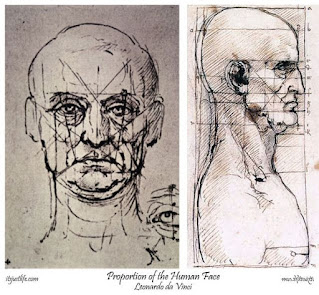
Leonardo Da Vinci was one example of a Renaissance artist who studied anatomy to improve realism in drawing.  Notice how he took notes on the bones as he studied and drew them.

Follow along with Ms. Ammons in this video to do the project!


Add your work to ARTSONIA!

Wednesday, September 30, 2020

Yayoi Kusama Polka-Dot Pumpkins


Begin this week's project by watching this short video about Japanese artist Yayoi Kusama.  She is sometimes called "The Princess of Polka Dots" because of her love of all things spotted.  She has become famous for polka dots!  She thinks of herself as one dot in a universe of dots, so a dotted pattern can make her "disappear" among lots of dots.  It's kind of like one person disappearing in a huge crowd.  She calls this obliteration.  That's a big word that means to make something go away.  

Watch here:  https://www.youtube.com/watch?v=GUoDUhsWJL8
Read here:  https://www.tate.org.uk/kids/explore/who-is/who-yayoi-kusama

Another way to make things disappear is to camouflage them against a similar background.  If you put a spotted object in front of a spotted background, it is hard to see.  
We would say it is camouflaged.    
Kusama would say the object has been obliterated.  
Look at this picture of Kusama with one of her pumpkin sculptures.  Her dress, the pumpkin, and the wall look similar.  They all blend together!

This week's art project challenge is to make a polka dot pumpkin and then to obliterate it!  You will create a little sculpture and then design a background to make it camouflaged.  Look at these examples by Prescott students, and then watch the video for directions. 


Add your work to ARTSONIA!

Fall Forests

 In this project, you will practice using the primary colors to mix the secondary colors.  


You will use different types of lines.


You will create art that shows the changing season by focusing on fall colors. 


 Watch this video to do the project with Ms. Ammons!

Add your work to ARTSONIA!


Falling Leaves

Do you remember which colors are warm and which colors are cool?  Warm colors make us think of the sun.  They are:  red, yellow and orange.  Cool colors remind us of the cool water in the ocean:  green, blue and purple.  


In this project, we will create a cool, breezy sky with cool colors.  We will make fall leaves with warm colors.  

Sample by Ms. Ammons

Watch this video to do the project with Ms. Ammons!

Add your work to ARTSONIA!

Copy this code:  WCCP-WSTF

Friday, September 25, 2020

3-D Paper Portraits

In this lesson, you will learn to draw a face with realistic proportions.  Then, you will be challenged to build a face from paper, using only scissors and glue.  

Sample Projects by Prescott Students

We have been studying Renaissance artists like Michelangelo and Leonardo Da Vinci.  You know that Renaissance artists studied the human body so that they could draw in a more realistic way.  They learned the proportions of the face by studying and measuring the distance between different parts of the face like the eyes, nose and mouth.  Look at this example of one of Leonardo's drawings:


Let's learn some of the proportions, and we will test them out on a magazine page.  Find a picture of a head from a magazine, or use the one provided.  Begin by drawing a line of symmetry down the middle of the face, dividing it into two sides.


Next, make a line to mark the top of the head, and make a line under the chin.  If you measure the distance between these two lines, and find the half-way point, it should line up with the eyes.  Your EYES are in the middle!  


When you draw the eyes, make sure that you leave a little space on each side of your head, and then leave space between they eyes that is about as wide as one eye. 

Now, find the half-way point between the eyes and the bottom of the chin.  Draw a small, horizontal line there to show where the bottom of the nose should be.  Also draw lines straight down from the corners of the eyes.  This should make a little box where your nose will go.

Finally, the mouth should go right below the nose, leaving just a small bit of space.  The corners of the mouth line up with the center of the eye.  The ears line up with the eyes and the nose. 

Practice finding these lines on your magazine page, and practice drawing a face using these proportions.  This video might also help:  VIDEO  

For this week's project, you will SCULPT a face using paper.  We will build, using cut paper shapes, but I want you to remember to use the proportions you just practiced!  Watch this video, and create your 3-D paper portrait.


Add your work to ARTSONIA!

Copy this code:  WCCP-WSTF


Thursday, September 24, 2020

Hiroshige and the Japanese Landscape

This week, we will learn about Ando Hiroshige.  He is one of the most famous Japanese artists of all time, and he was the last master artist who made a special kind of art called ukiyo-e.  He travelled all over Japan to find inspiration for his paintings and prints, and he used his artwork to show people the beauty of Japan.


Most of his prints and paintings were landscapes.  Landscapes are paintings about a place.  They can show how a place looked at an exact moment:  in a rain storm, at sunrise, or during a special holiday or event.  Artists can make many pictures of one place, but still could have each one look different.  

We will begin with a scavenger hunt.  We will look at Hiroshige's work, and we will find some things that are commonly seen in photos and paintings of Japan.  As you watch the video, look for these things:

  • Mount Fuji:  A tall mountain that used to be an active volcano.
  • Japanese Bridge:  These bridges arc like a rainbow over the water.
  • Blossoms:  Flowers that grow on trees like almond or cherry trees.
  • Pagodas:  Buildings with a many-layered roof, curled at the sides.
  • Koi or Carp:  Fish common to Japanese gardens
  • Kimonos:  Traditional Japanese clothing


Student Samples

    Your challenge this week is to make a picture with all of these things in the scene!  We will use crayons and watercolors, and we will fold an origami kimono.  Watch these videos to do the  project with Ms. Ammons.  The first one will lead you through making the background.  The second one shows how to make your kimono and figure.
    Scavenger Hunt and Background
    Kimono and Figure

    Add your work to ARTSONIA!

    Copy this code:  WCCP-WSTF


    Secondary Color Pumpkin Patch


    This week, we will practice mixing the secondary colors and using the secondary colors to make art.  The secondary colors are purple, green and orange.  

    You can make each these colors by mixing two primary colors!

    Can you think of things that are secondary colors?  I am going to challenge you to practice mixing these colors with your paint. We will be painting two papers, and we will use those painted papers to make a fall picture with orange pumpkins in green grass under a purple sky.  Watch this video to follow Ms. Ammons as she makes her secondary colors project.  


    Add your work to ARTSONIA!

    Copy this code:  WCCP-WSTF


    Stormy Seas Ahead

    Rembrandt's Stolen Work, Christ in the Storm on the Sea of Galilee  My favorite new project this year was one I came up with when I was...